Tuesday 11 August 2015

Use of charcoal

So today we did portrait using charcoal.Each one of us had to stand in front of the class and pose at a comfortable position for a period of time.
The first time was 8 mins and we had to draw Veanne.
she was sitting on a chair.I didn't have enough time to draw in the details as i thought i had plenty of time to draw her thus i ended up just drawing the shape of her body.

The next person we drew was Khalis and we had 5 mins to draw him.
I managed to draw his body and his posture.

We were given 4 mins to draw him.
2 mins to draw her.
And finally the last min to draw him.

In conclusion, during this period of time drawing these people i faced difficulties as it was the first time i handled charcoal and draw human beings.I also did not manage to have enough time to fill in the details(eg. eyes , mouth , nose) so i just focused on the body outline of each person.

Friday 7 August 2015

Making of clay pot

On the second art lesson we learnt how to make a pot using the coiling method.
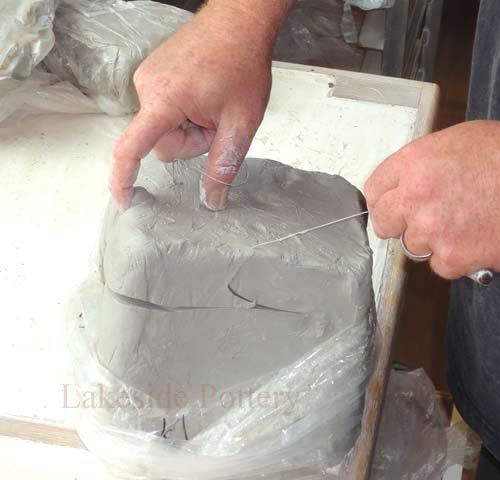
First we had to wedge the clay to remove the air bubbles.
Then we flatten the clay to a certain thickness.
After that we used a needle to cut out the shape of the circle.
When we had the shape of a circle we score the sides so that the glue stick have more surface area and can stick this easily.
then we used a machine that can form the shape of a coil easily.
we score on the coils and use the glue stick.
We paste the coil and the base together.
we continued this step for the next three coils.
After putting the three coils together,we
used a wooden tool to smoothen and connect the coils together.


Then we used our hands to give the shape of the clay.

For the pot to look nicer,we used a loop tool to trim the pot inside and outside.

After the trimming the pot with the different tools,we were told to blow dry our clay.
After the dried pot is harden we used sum clay to put at the side of the pot so that the pot will not fall off.


MORE INTERESTING POTS

http://www.veniceclayartists.com/wp-content/uploads/2013/03/GILBERT-VALENTIN-Ceramic-pi.jpg
GILBERT VALENTIN Ceramic pot
the unique pattern on the pot caught my attention.
https://blogger.googleusercontent.com/img/b/R29vZ2xl/AVvXsEiwGIWIJ-0dNP0UM8ZPF2Dmj4dr-47eLCDghB1AoyyL_Pde47pE-vfFQyvCqA5L0gi6RZ3-DykhP8xegMnWJ8_C-5F7SO3Ls-od0qRKko9ozbLerruDlA8SodH3JHUHvCzarzKI_L-I9pQ/s1600/009.JPG
I found this on two tribes blog spot.This is Micaceous clay pot with black underglaze, fired outdoors . It is a tribe pot and reminds me of the art movement of the ancient egyptian art (3000 BC to 100 AD.)
http://previews.123rf.com/images/sbotas/sbotas1008/sbotas100800009/7542747-Broken-antique-clay-pot-on-a-white-background-Stock-Photo-vase.jpg
Broken antique clay pot on a white background (vase) I find this very interesting because as it shows the the clay pot broken into pieces.
www.craftsvilla.com                                            Green pot 
The leaves pattern hand-painted on vibrant green terracotta pot will look exotic when placed on center of your dining table or on your side tables.
                                                                The Treasure of Mata Ortiz   
https://alumni.stanford.edu/get/file2/publication/article/SAAMAG/39966/live/IMG
I like the patterns on the vask as it has different designs.The top of the pot has a unique opening unlike a normal clay pot.
                                          New Mexico Clay Pottery mata ortiz mexican pottery
https://mexicanartwork.files.wordpress.com/2011/07/pottery.jpg
I like the designs on the pot as it is very eye- catching.
                                           Greek Vase
http://www.hartzler.org/cc307/minoan/images/2d.jpg
diagonal lines forming both series of parallel lines and criss-crosses on a light surface.
This looks like a jug made out of clay which is interesting as most of the jugs look like this:
Native American Art Collection Installation of Pueblo Indian Pottery
https://www.montclairartmuseum.org/sites/default/files/styles/large/public/Folwell.jpg?itok=P29vmU-0
I like the how the artists uses lines to form the designs on the pot.

                                                          Zulu Clay Pots. Thembi Nala (26" Dia.)
http://www.nkosiimportedcrafts.com/uploads/pot01.jpg
The patterns and decoration on the pots vary according to family and region. Usually one can distinguish two styles of decoration: incised decoration and raised decoration.  The Nala family has incorporated both styles into their pots.
                                            Israle Renterias Mata Ortiz Pottery
http://www.mataortiz.com/images11/israelrenteriad2.jpg
Delicate seed pot by Israel Renteria. This beautiful off-white olla is very well formed and painted with an amazing precision.

Saturday 18 July 2015


Hopi Pot
Artist: Iris Nampeyo 
                                                                  Width: 8" diameter
                                                                    Height: 4 3/4"
                                               I like the way the pot is shape into and the 
                                                     smooth sides attract my attention.
Artist:Chris Hawkins
I like how he glaze on the pots.
Artist:Peter Karner
I like the pattern on the pot.
He uses lines and shapes to form patterns on the pot to make it appealing

I like how the pot looks really old and antique like.
It also have different colours of the same shade.
This is the making of a pot on wheel.


                                                                Making a clay coil pot 

                                                                   
                                                                                 Prehistoric Pottery
        workshops learn to find and prepare natural clay, make their own pottery tools, form and decorate                                                 various different pot types from the Neolithic

                                                              Painting Clay Pots with Glaze
                                                                                         
                                                                 Process of Pinching
                                                                           
Art lesson

During the first clay lesson in class, we learnt how to slice the clay using a wire clay cutter tool.We were told to cut a certain amount of clay and knead them to remove the air bubbles.


Next we split the clay into equal halves.We were told to put one of the halves into a wet towel do that it will stay moist.
                                                                                       

 After that we pinch the clay as shown at the 'process of pinching.'
Then we pinch till it form half of an egg shape with smooth edges.
Once we got the bowl shape, We used a needle clay tool to score (criss-cross) the top.This way the glue stick can easily stick with another clay.
                                                                                    

Then we do the whole process for the other half of the clay till we get the same shape. 
After that we'paste' them together.
                                                                                    
When the two halves join together it forms an egg shape with uneven edges.
Then we use a spatula to make the egg shape smooth.